Notes003:简洁Go ssh git仓库自动部署CICD

1. 准备
我的时候我们不需要一个复杂很重的CI/CD,
- Github Action 国内网络不好,部署服务器还要安装agent
- Gitlab Runner 公司网络是私有的,内网网络隔离,各种流程,心累
- Linux SSH Git Hook 刚刚好可以,轻量简洁,不吃性能.
- Linux 开启SSH的服务器
- LInux 机器安装 git 等语言编译环境
- 使用git init –bare 创建好linux ssh 代码仓库
mkdir -p /code && git init --bare your_code_repo.git - 开发机器push已有代码
git remote set-url origin ssh://SSH帐号@服务器IPor域名:端口/code/your_code_repo.git - 开发机器push 已有代码到 linux 服务器
- 开发机器使用
git clone ssh://SSH帐号@服务器IPor域名:端口/linux机器代码仓库路径 - eg
git clone ssh://ericzhou@mojotv.cn:4422/code/go-project来克隆代码
2. 目录说明
REPO=/data/termim我的代码仓库放的地址DIR=/tmp/termim本机linux服务器 git clone 的编译代码目录git clone $REPO $DIR(本机内部代码仓库git clone 到 $DIR 目录)BRANCH需要被自动部署的代码分支
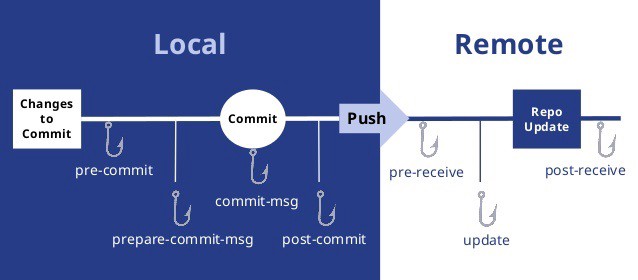
3. git hook post-receive
注意编写 post-receive 代码时候不要试图在代码仓库目录来直接编译代码,
需要先git clone 到其他代码进行编译, git clone 推荐使用 git clone --single-branch --branch $BRANCH $REPO $DIR #clone $REPO(代码仓库)到$DIR(编译目录),同时git checkout到$BRNACH(部署分支)
post-receive HOOK 在linux服务器的代码仓库目录中添加, 在客户端执行这些操作是不生效.
vim $REPO_BARE/hook/post-receive 这个文件本质是一个shell脚本,
创建好了之后 请赋予可执行权限 chmod +x post-receive
3.1 golang post-receive hook exmaple
#!/bin/bash -xv
# -xv shell脚本调试之用 这个参数也可以去掉

# golang 编译环境
export GOPROXY=https://mirrors.aliyun.com/goproxy/
export GOPATH=/gopath
export GOBIN=/gopath/bin
export PATH=$PATH:/usr/local/go/bin:$GOBIN:/usr/local/rvm/gems/ruby-2.5.5/bin:/root/.gem/ruby/bin:/usr/local/rvm/rubies/ruby-2.5.5/bin

REPO=/code/termim.git #代码repo地址
BRANCH=dev  #需要部署的分支
DIR=/builds/termim  #编译代码的目录, 不能在代码仓库中直接编译
rm -rf $DIR && mkdir -p $DIR #删除就的编译代码目录
git clone --single-branch --branch $BRANCH $REPO $DIR #clone $REPO(代码仓库)到$DIR(编译目录),同时git checkout到$BRNACH(部署分支)
cd $DIR && unset GIT_DIR #切换到编译目录
GITHASH=$(git rev-parse --short HEAD)  #显示编译git hash
BUILDATE=$(date) # 编译的时间
echo $GITHASH $BUILDATE
go build -ldflags "-w -s -X 'mojotv.cn/termim/config.BuildAt=$BUILDATE' -X 'mojotv.cn/termim/config.GitHash=$GITHASH'" -o $GOBIN/termim  #注入版本信息和编译时间
supervisorctl restart termim  #重启服务
怎么调试 post-receive 这个脚本, 切换到 git帐号 linux su $GitClone帐号, cd $REPO/.git/hook/ 执行脚本进行调试. ./post-receive,
开发机器执行git push效果如下:
➜  termim git:(dev) git push
枚举对象: 7, 完成.
对象计数中: 100% (7/7), 完成.
使用 4 个线程进行压缩
压缩对象中: 100% (4/4), 完成.
写入对象中: 100% (4/4), 395 字节 | 395.00 KiB/s, 完成.
总共 4(差异 2),复用 0(差异 0),包复用 0
remote: 正克隆到 '/builds/termim'...
remote: 完成.
remote: * dev
remote: termim: stopped
remote: termim: started
To ssh://mojotv.cn:5522/code/termim.git
   f04462c..bd4c316  dev -> dev
3.1 ruby jekyll post-receive hook exmaple
#!/bin/bash -xv
# -xv shell脚本调试之用 这个参数也可以去掉
# 设置环境变量 ruby jekyll
type rvm >/dev/null 2>/dev/null || echo ${PATH} | __rvm_grep "/usr/local/rvm/bin" > /dev/null || export PATH="${PATH}:/usr/local/rvm/bin"


REPO=/code/blog.git #代码repo地址
BRANCH=master  #需要部署的分支
DIR=/builds/tech.mojotv.cn  #编译代码的目录, 不能在代码仓库中直接编译
rm -rf $DIR && mkdir -p $DIR #删除旧的编译代码目录
git clone --single-branch --branch $BRANCH $REPO $DIR #clone $REPO(代码仓库)到$DIR(编译目录),同时git checkout到$BRNACH(部署分支)
cd $DIR && unset GIT_DIR #切换到编译目录
git branch #查看分支
bundle exec jekyll build -d /data/tech.mojotv.cn  #编译jekyll文件 输出编译好的html静态文件到 /data/tech.mojotv.cn
自动编译输出结果
➜  tech.mojotv.cn git:(master) git push
枚举对象: 9, 完成.
对象计数中: 100% (9/9), 完成.
使用 4 个线程进行压缩
压缩对象中: 100% (5/5), 完成.
写入对象中: 100% (5/5), 784 字节 | 784.00 KiB/s, 完成.
总共 5(差异 4),复用 0(差异 0),包复用 0
remote: Resolving deltas: 100% (4/4), completed with 4 local objects.
To github.com:mojocn/tech.mojotv.cn.git
   bba80d1..456d2be  master -> master
枚举对象: 9, 完成.
对象计数中: 100% (9/9), 完成.
使用 4 个线程进行压缩
压缩对象中: 100% (5/5), 完成.
写入对象中: 100% (5/5), 784 字节 | 784.00 KiB/s, 完成.
总共 5(差异 4),复用 0(差异 0),包复用 0
remote: 正克隆到 '/builds/tech.mojotv.cn'...
remote: 完成.
remote: * master
remote: Configuration file: /builds/tech.mojotv.cn/_config.yml
remote:             Source: /builds/tech.mojotv.cn
remote:        Destination: /data/tech.mojotv.cn
remote:  Incremental build: disabled. Enable with --incremental
remote:       Generating...
remote:                     done in 11.36 seconds.
remote:  Auto-regeneration: disabled. Use --watch to enable.
To ssh://mojotv.cn:5522/code/blog.git
   bba80d1..456d2be  master -> master
4.结果
以后每一次push 代码的时候都会出发 dev分支进行编译和程序重启